A Philippine Passport is a travel document issued by the Department of Foreign Affairs (DFA) in the Philippines. It is primarily used in international travel that serves as a valid document which certifies the passport holder’s true identity and nationality. To get a Philippine Passport, applicants must comply certain requirements and follow the standard procedure.
Before you can apply for a passport, the first thing you have to do is to make an official appointment to DFA. Through Passport Appointment System by the Department of Foreign Affairs (DFA), applicants can now conveniently set an appointment online and process the passport application. Setting an appointment in their website is so easy and understandable. However, you need an active email (Google Mail or Yahoo Mail) to confirm your appointment schedule and download your application form.

This guide will help you out on how to get a Philippine Passport. It includes the general requirements, online appointment procedure with screenshots provided, and useful pieces of information you need to know.
Philippine Passport General Requirements
- Personal Appearance at the DFA Office
- Confirmed Appointment
- Application Form
- PSA Birth Certificate
- At least one (1) Primary ID and at least (2) Supporting Documents. Please refer to the lists below.
List of Acceptable IDs (At least 1 of the following IDs):
Government-Issued Picture IDs.
- Digitized SSS ID
- Driver’s License
- GSIS E-Card
- PRC ID
- IBP ID
- OWWA ID
- Digitized BIR ID
- Senior Citizen’s ID
- Unified Multi-purpose ID (UMID)
- Voter’s ID
Other acceptable valid IDs.
- Old College ID
- Alumni ID
- Old Employment IDs
List of Supporting Documents (At least 2 of the following Documents):
Old documents issued at least one year prior to date of application that show correct name, date and place of birth, picture and signature of applicant.
- Digitized Postal ID
- NBI Clearance
- Police Clearance
- Barangay Clearance
- PSA Marriage Contract
- Land Title
- Seaman’s Book
- School Yearbook
- Government Service Record
- Readable SSS-E1 Form or Microfilmed Copy of SSS-E1 Form
- Elementary or High School Form 137 or Transcript of Records with readable dry seal
- Voter’s Certification, List of Voters and Voter’s Registration Record (please attach receipt)
How to Get Philippine Passport (Passport Appointment System) 2018
1. Set an Appointment
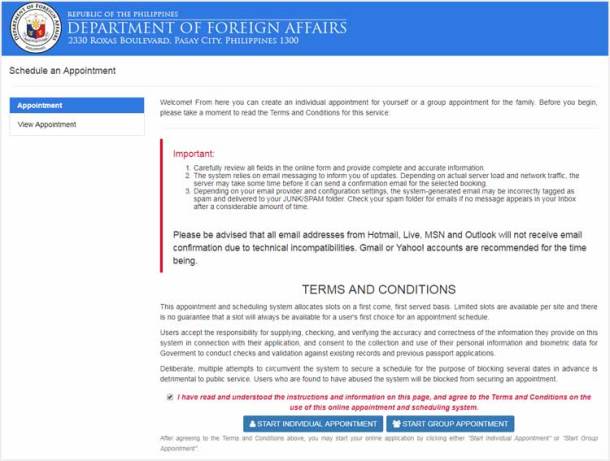
First off, before you can get a passport, you must set an official appointment to a DFA Regional Office or Satellite Offices located in selected malls. Go to the official website of DFA Passport Appointment System – https://www.passport.gov.ph/appointment. Read the Terms and Conditions, mark check the checkbox, then choose “Start Individual Appointment” if you are applying for yourself or “Start Group Appointment” if you are applying in behalf of family members or a certain group.
2. Select a DFA Regional Office to Apply

The next step is to select a DFA Regional Office to apply for a passport. Select the Region (ASIA PACIFIC), Country (Philippines) and Site (Davao, Cebu, etc.). On the left side, the selected Office Name, Address and Contact Number will be displayed. Then, click the Next button to continue.
3. Set Date and Time of Appointment

Available date of appointments are marked by green color on the calendar where you can make an appointment while fully booked are marked by red color. Same thing with the time. Choose an available and desired date and time of your appointment. Click the Next button.
4. Accomplish the Personal Information Form

Accomplish the Personal Information Form which includes your phone number, mobile number, email address, last name, first name, middle name, birth date, gender, civil status, birth legitimacy, country of birth, province and city/municipality. Click the Next button to proceed.
5. Fill-up the Family Information Form

In this step, you’ll be asked to enter your father’s and mother’s information. Then, click the Next button.
6. Complete the Application Information Form

Complete the application form by selecting the application type (new), basis of Philippine Citizenship (birth, naturalization, etc.), emergency contact person and contact number.
7. Provide Your Contact Information

To finish the application form, you should provide your complete address, city, province, occupation, office number and office address (optional). Then click the Next button.
8. Submit Your Application

You can now view the entire application form. You can still Edit it but make sure to click the Save button after editing. Mark check the reCaptcha checkbox “I am not a robot”. Then, read and mark check the red message box under it. To confirm your appointment, click the CONFIRM button.
If successful, you should see on your screen a confirmation message:
Please click on the confirmation link sent to your email to complete online appointment scheduling process.
Be careful in this step since if you take too long, your application might expire. You will automatically be redirected to step 2, but you can still choose the same date and time. The data you entered before won’t be erased so it will make the process faster.
9. Confirm Your Appointment

Open the Email sent by DFA. If you are using Google Mail (Gmail), go to the Updates category in your Inbox and look for the DFA Email “appointment – DFA Passport Appointment System – Notice of Provisional Schedule”. The email contains a message about the finalization of your provisional booking. It is used to confirm your temporary appointment within 72 hours, else it will be cancelled. To confirm your provisional schedule or appointment, click on “Click here to CONFIRM you booking” link.
10. Download Your Application Form

Go back to your email again, refresh it and look for the other email sent by DFA “appointment – DFA Passport Appointment – Confirmation Notification”. The email includes the details of your appointment (Appointment Reference Number or Code, DFA Regional Office, Date and Time) including the link copy of your Application Form.

Now that you have confirmed your appointment, the next step is to download your application form and print it in A4-size paper. To view, cancel, or download filled application form, you should go to https://www.passport.gov.ph/appointment/view. Enter the Application Code (check your email for the code) and Email Address of your current appointment and click the View Details button.

After printing your application form, it is also advisable to print the 2 emails sent by the DFA. The emails are not really required but when the need arises, it’s better to be ready.
11. Go to the DFA Office
At the date of your appointment, bring all your requirements and go to the selected DFA Office. Present your printed application form to the officer in Appointment Counter. Get your queue number and wait for your turn on the Information Counter to present your documents. Then, you’ll be asked to pay for the corresponding fee to the Passport Enrollment Section. After the payment has been made, you’ll be asked to proceed to the Encoding Section for photo and biometric data capture.
Optional: Your passport may be delivered at your doorstep or pick it up at the DFA Office. Go to the Delivery Counter if you want it delivered.
Processing Fee:
Regular processing: ₱950
Express processing: ₱1,200 – All passport applications processed on Saturdays are charged ₱1,200
Passport Availability After Application:
| Application | Within Metro Manila | DFA Regional Offices |
|---|---|---|
| Regular Processing | 15 working days | 20 working days |
| Express Processing | 7 working days | 10 working days |
Applications abroad: 30 working days
Passport Validity:
10 Years – The Republic Act 10928 was approved by President Rodrigo Duterte on August 2, 2017 which extends the validity of Philippine passport from formerly 5 years to 10 years.
Friendly Reminders
- Bring all your requirements.
- Provide at least two (2) photo copies of each original document you are about to bring.
- Follow proper dress code.
- Be at the office an hour prior to the appointment.
DFA Contacts:
Main Address: 2330 Roxas Boulevard, Pasay City, Philippines
Hotline: (632) 556 0000 – For Passport, Authentication, & Other Consular Inquiries
That was the step by step guide on How to Get Philippine Passport. What are your thoughts about this? Share it in comment section.


I tried to look at the appointment date and time and to my surprise, all dates and times are all in red until end of June 2018! Meaning, there is no slot for more than 4 months.
Is it so difficult to get a Philippines passport?
What if someone is really in need to go abroad?